YayBlogger.com
BLOGGER TEMPLATES
Showing posts with label decorate. Show all posts

Monday, 28 October 2013

HAUL time! :3

Hi everyone! Recently I have been buying quite a few kawaii products so I thought I'd share them with you guys, and this is what I got.... you can find links and details at the bottom of the page


This pic shows most of the things I got, apart from my boots.


Firstly I got some floral cabochons, which you can use to decorate things. I only just discovered them recently and there will definitely be a tutorial for decoden once I collect enough cabochons.


I also got these cute heart cabochons, I really love the colours!


Recently I started college so I decided to get a USB stick so that I could use it for school work if I needed to. This one is so awsome because it's a rilakkuma USB stick, it's 8GB and it was a reasonable price. I decided to put it on a chain so that I could wear it as a necklace too. It's a good product and I'm really happy with it!


Another thing I got were these panda earmuffs, the reason I got them was because I have barely anything cute to wear in the winter and they match my panda gloves too. They are really soft and fluffy and so kawaii <3 When I got them some of the stitching was undone so I had to sew it together other than that they're good =)


The next thing I got were these Hello kitty headphones, I've wanted them for so so long but only just got round to buying them. They were really cheap and really good quality for the price, and they're soo cute!!!!


As you can see they have these discs on the side that you can swap, the one above is the one I like the most.

I think it's really cool that you can swap the discs, also you could take the disc off and decoden the bit where you clip it on rather than using the discs. Or you could even decoden a pair of the discs so that you could swap between a decoden disc and a normal one.


And there were these ones as an alternative.


Another thing I got was this cord wrap because the cord on my headphone were real long, and it kept swinging around and hitting the floor :/ The cord wrap is pretty cute but f you're looking for a really good quality one you should be willing to be spending a little more than I did.


Also I got some heart sunglasses because when it comes to summer I want to have some that are more fairy kei.


Now that I have started college I decided to get a few of these folders to organise all my work.


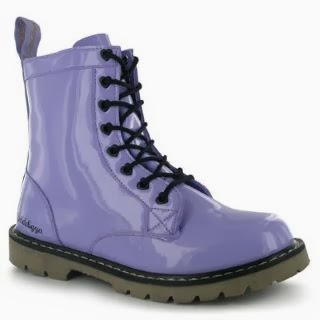
And the last thing I got are these boots which I love soo much!! They're really pretty, I love the colour and the cute heart eyelets. And they're also really comfortable and durable.


Links

Hair accessories - £0.99 hair shop
Animal folder - £0.99 on discount in WHSmith
Jumper (blue) - £5 primark (in the first picture)

Monday, 21 October 2013

Heart elbow patch DIY

The other day I saw someone with elbow patches on their jumper and I was instantly inspired to make some kawaii ones for myself, So here's a tutorial. It's really easy to make and doesn't take much time, the finished thing looks pretty cute too :3


What you will need:
  • The jumper that you want to decorate.
  • Some fabric in your chosen colour - this is for the patch, colours that go well are pink/blue, yellow/purple etc. If you're going for a fairy kei kind of look be sure to use pastel colours.
  • A5 paper.
  • Pencil.
  • Scissors.
  • Pin.
  • Thread that matches the colour of the patch and an iron not pictured because I forgot :/


Start by folding the paper in half horizontally.


Draw half a heart shape on one side of the fold if you want you can just find a pic of a heart online and print it out.


Fold the page and cut out the shape.


So you should have a heart shape like this.


Trace around the heart onto the back of the fabric you want for your patch do this twice, one for each sleeve.


Cut around the line, leave about 1-2cm for seam allowance.


Cut notches on the edge of the fabric where there are curves and corners as shown.


Iron the seam allowance down onto the wrong side of the fabric.


When you turn it around it should look like this, as you can see the edges are not smooth but you can fix this when you sew it on.


Repeat with the other heart.


Put the jumper on and put a pin through the sleeve in the centre of your elbow, but be careful!


Place the heart on the sleeve, use the pin to help you place it.


Now you can pin it and sew it on if the edges of yours are like mine you can edit it when sewing by stretching out the sides a little when you stitch. Make small stitches over the edge of the fabric, about 4mm apart.


Repeat with the other sleeve. But this time rather than using a pin to find where the centre of your elbow is, you can trace several points from the first sleeve onto the other to make it symmetrical.


And that's it! I hope you enjoyed this tutorial and have a go yourself :)

Tuesday, 20 August 2013

Nail art tutorials

I like nail art but I always muck it up because I'm not patient enough to let it dry properly : | But I still enjoy it, If you want to start doing nail art you can get tools specifically made for it. I usually just use a pencil as a dotting tool and a small paint brush for details. If you want to you can paint onto fake nails and then glue them on when they're dry, it's much easier if you're right handed like me (or left handed ofcourse). I don't even bother trying to paint designs on my right hand anymore... but anyway here are some designs that you might like to try out.


This one is inspired by Kyari Pamyu Pamyu's Ponponpon video, If you don't know what I'm talking about then watch it here it's really weird but cool.


Here are some visual tutorials:

Keroppi


Hello kitty


The link to this tutorial http://blackcoffee1437.blogspot.co.uk/2011/03/panda-nail-art-tutorial.html


http://luuthienluv.blog.me/140135671567


Have fun creating your own nail art! Feel free to comment a link to any kawaii nail art/tutorials you stumble upon :)

Friday, 2 August 2013

DIY Totoro bag Part 2


Hi there, here's the second part to my Totoro bag tutorial. If you haven't seen the first part then click here to go to it. In this part I'll show you how to construct the outer part and the ears and arms, at this point the lining of your bag should have been made.


This is how your bag should look so far.


Pin along the bottom of the ears and the arms, make sure that the right sides of the fabric are facing inwards.


Sew the shapes but leave the bottom open, after I sewed mine I cut seam smaller (so that it was about 5mm) and then I made marks on the bottom as you can see so that I wouldn't sew them the wrong way round or something.


Turn the pieces inside out.


Going back to the main piece, pin the top of front of the bag (and the ears/arms, the ears and arms should be on the inside) to the side piece that has the zip on it.


Check whilst you still have the pins in that the bag looks like this when you turn it inside out.


This pic is of the bag turned inside out after I sewed it (that's the next step obvs - you have to sew).


This pic is just to show you how the top looks like with the front sewn on.


The next thing I did was pin the bag strap onto the side that doesn't have the zip on it.


And again more sewing.


Next thing I did was sew the edges of the sides together (these are the smaller egdes I'm talking about).


This pic shows what it will look like when you turn the sides inside out.


Here's anotherpic of thesame thing cuz the last one was a bit crappy : /


Now pin and sew the bottom side to the bottom of the front. At this point I realised that the bag was floppy and needed some support, so I went hunting for this to use. Cardboard wouldn't work although I had quite a bit of that, I tried wire but it wouldn't make the exact shape I wanted and I didn't want the things I put in the bag to bulge through the front so...


I found another old backpack that I was already using for spare bits and found more of this plastic board stuff I'd used before for my fairy kei bag, I still don't know what it is most likely a type of polystyrene.


At the front I inserted it in between the front inside and the lining, I used 9 small stitches around the edges of the front (looks like Totoro has dimples now lol, It's more noticeable in the pictures. But the reason why I sewed it on instead of glueing it is because glue ruins fabric, and it might disolve if you wash it).


When I added the padding to the back of the bag I sewed two arrow pointing up, it helps to keep the foam stuff in place.


Nearly done! =) turn the bag inside out (so that the outside of the bag is inside, it will need turning again later. Don't forget to put the strap on the inside).


Pin the back of the bag to the sides and sew it, leave a gap atthe bottom for turning it.


Turn it inside out so that it's the right way round, sew the gap at the bottom closed, I used my sewing machine to close the back so there's a line of stitches running along the bottom.


So this is what the finished thing turned out to be like, I'm quite happy with the result. Here's a pic of the back of the bag after I finished sewing it up, the bottom where I closed the seam is a bit rough. But I'd been working on this for so long and I was in a rush so I just finished it like that. If you wanna make yours neater just hand sew a ladder stitch to close it :)


Phew, that was a lot of work. I'm so happy to finally have this up I've been working on it for days I hope it was useful to you :) Have fun making your own!