YayBlogger.com
BLOGGER TEMPLATES

Sunday, 18 May 2014

Outfit post #3

Hi guys heres another outfit post, I tried to be as kawaii as possible for this one! Hope you enjoy :3


Today I'm wearing a striped tank top and denim overalls from Primark. A Rilakkuma hip bag, heart shaped sunglasses. And also my coral juju jellies with pink and blue socks.

I'll be posting links to the items later 

Monday, 28 April 2014

Outfit post #2

Hey guys! My creepers came in the post just the other day so I decided to coordinate them with some of my clothes to show you :3  


Here I'm wearing light blue leggings, a blue tshirt and my red corduroy pinafore dress all from Primark.


These are the creepers! I got them from Shoezone for only about £15 I wore them with frilly blue socks which are also from Primark. 

Hope you enjoyed :3

Thursday, 24 April 2014

Outfit post!

I've been wanting to do an outfit post for ages so finally here it is hope you enjoy!


The shirt I'm wearing is the Spirited away shirt that I mentioned in my latest haul, I decided to wear it with marvel comic leggings that I got from Primark. I'm also wearing a mint coloured hoodie with canvas shoes and frilly socks which are also from Primark.

I decided to make it a little more interesting by wearing different coloured shoes.

Also I'm wearing my awesome tiger backpack that arrived in the post just yesterday, I was so excited to get this! There are better pics of it below


And for accessories I went for a mood ring, which is why I took two pics the second one is a much more pretty colour. And my turtle ring that my parents got me as a birthday present a couple years ago.

So that was my first outfit post, I hope you enjoyed it! There will be more to come :)


Wednesday, 23 April 2014

Another Haul


In this pic you can see the bambi shirt I bought which I wore with my overalls both from Primark, excuse the funny face lol 😜


This is the fob watch I got from Camden market, it cost me only £4 and I just really love the style of it.


I also got a Studio Ghibli - Spirited away shirt from Camden market because I freakin love Studio Ghibli's animations!


And I got these awesome jelly shoes from Office that I have wanted for ages, they cost £25 and they're by Juju. Check them out they have lots of cool colours and designs :)  
I also ordered a 3D Rilakkuma case because it's sooo kawaii, I think it was about £2 from Ebay.


I got this awesome satchel bag for only £9 from primark for when I'm going out and don't have much to carry.


And finally I got this awesome tiger back pack that I have been craving for ages ever since I followed Tokyo fashion on facebook and saw it in a post. I totally had to get it because it's weird and it's cool and I know that I'll be the only one in college who has it, and I like to stand out :)

Saturday, 22 February 2014

This is how I did it! - DIY bear bag

Bear bags are like a must have accessory, but you don't really see them in shops and they can be a tad too expensive for me. So I thought I make one myself or two :)


Front


The back - the tail is attached to the zip.


Bear bags are so awesome, they're really cute and pretty easy to make. Here's one I made from a small bear, it doesn't hold much because it's so small. The strap on it goes over your shoulder and it's just basically for things like your phone or purse.

If you want to make one like this here is a tutorial you can use: http://egl.livejournal.com/11582191.html#cutid1 I didn't use this tutorial but it's very similar to the technique I used.


And unfortunately I didn't take photos whilst making it. So I made a another bear bag, a bear backpack!
And I'm gonna show you how to do it =D

This is what you will need:

  • A bear
  • lining fabric
  • Scissors
  • Pins
  • Sewing machine
  • needle and thread
  • zip
  • leather for the straps


Cut a hole in the bag of the bear that is less than the length of the zip, take the stuffing out of the torso of the bear but leave the stuffing in the limbs and head (also leave some in the torso so that when you put things inside the back the shape won't change). 


 Fold the lining in half and sew two edges together leaving a gap at the top that is as long as the hole in the bear's back.


 Place the lining into the hole so that the nice side of the lining fabric is on the inside.


  Sew the bottom of the zip into the base of the hole this should be near the tail.


Line up the zip (wrong side out), the edge of the hole and the lining as shown.

  Sew along the zip/edge of hole to attach the zip to the bear and also the lining.


Then sew on the straps to the middle/back of the head and the top of the legs.

Hope you found this helpful stay tuned for more DIYs and fashion posts (≧◡≦)


Tuesday, 5 November 2013

Aurora

Hi everyone I just started selling my art so if you're interested visit my Etsy shop https://www.etsy.com/uk/shop/Suketchi?ref=si_shop


 Cyber goth girl


Harry Styles


Monday, 28 October 2013

HAUL time! :3

Hi everyone! Recently I have been buying quite a few kawaii products so I thought I'd share them with you guys, and this is what I got.... you can find links and details at the bottom of the page


This pic shows most of the things I got, apart from my boots.


Firstly I got some floral cabochons, which you can use to decorate things. I only just discovered them recently and there will definitely be a tutorial for decoden once I collect enough cabochons.


I also got these cute heart cabochons, I really love the colours!


Recently I started college so I decided to get a USB stick so that I could use it for school work if I needed to. This one is so awsome because it's a rilakkuma USB stick, it's 8GB and it was a reasonable price. I decided to put it on a chain so that I could wear it as a necklace too. It's a good product and I'm really happy with it!


Another thing I got were these panda earmuffs, the reason I got them was because I have barely anything cute to wear in the winter and they match my panda gloves too. They are really soft and fluffy and so kawaii <3 When I got them some of the stitching was undone so I had to sew it together other than that they're good =)


The next thing I got were these Hello kitty headphones, I've wanted them for so so long but only just got round to buying them. They were really cheap and really good quality for the price, and they're soo cute!!!!


As you can see they have these discs on the side that you can swap, the one above is the one I like the most.

I think it's really cool that you can swap the discs, also you could take the disc off and decoden the bit where you clip it on rather than using the discs. Or you could even decoden a pair of the discs so that you could swap between a decoden disc and a normal one.


And there were these ones as an alternative.


Another thing I got was this cord wrap because the cord on my headphone were real long, and it kept swinging around and hitting the floor :/ The cord wrap is pretty cute but f you're looking for a really good quality one you should be willing to be spending a little more than I did.


Also I got some heart sunglasses because when it comes to summer I want to have some that are more fairy kei.


Now that I have started college I decided to get a few of these folders to organise all my work.


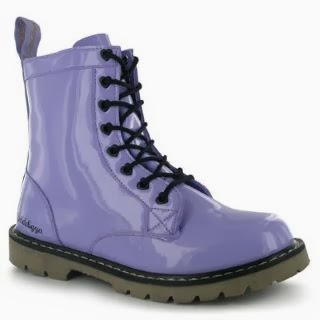
And the last thing I got are these boots which I love soo much!! They're really pretty, I love the colour and the cute heart eyelets. And they're also really comfortable and durable.


Links

Hair accessories - £0.99 hair shop
Animal folder - £0.99 on discount in WHSmith
Jumper (blue) - £5 primark (in the first picture)

Monday, 21 October 2013

Heart elbow patch DIY

The other day I saw someone with elbow patches on their jumper and I was instantly inspired to make some kawaii ones for myself, So here's a tutorial. It's really easy to make and doesn't take much time, the finished thing looks pretty cute too :3


What you will need:
  • The jumper that you want to decorate.
  • Some fabric in your chosen colour - this is for the patch, colours that go well are pink/blue, yellow/purple etc. If you're going for a fairy kei kind of look be sure to use pastel colours.
  • A5 paper.
  • Pencil.
  • Scissors.
  • Pin.
  • Thread that matches the colour of the patch and an iron not pictured because I forgot :/


Start by folding the paper in half horizontally.


Draw half a heart shape on one side of the fold if you want you can just find a pic of a heart online and print it out.


Fold the page and cut out the shape.


So you should have a heart shape like this.


Trace around the heart onto the back of the fabric you want for your patch do this twice, one for each sleeve.


Cut around the line, leave about 1-2cm for seam allowance.


Cut notches on the edge of the fabric where there are curves and corners as shown.


Iron the seam allowance down onto the wrong side of the fabric.


When you turn it around it should look like this, as you can see the edges are not smooth but you can fix this when you sew it on.


Repeat with the other heart.


Put the jumper on and put a pin through the sleeve in the centre of your elbow, but be careful!


Place the heart on the sleeve, use the pin to help you place it.


Now you can pin it and sew it on if the edges of yours are like mine you can edit it when sewing by stretching out the sides a little when you stitch. Make small stitches over the edge of the fabric, about 4mm apart.


Repeat with the other sleeve. But this time rather than using a pin to find where the centre of your elbow is, you can trace several points from the first sleeve onto the other to make it symmetrical.


And that's it! I hope you enjoyed this tutorial and have a go yourself :)