Accessories have a big impact on the overall look of your kawaii outfit. Go for things that are pastel colored (pink, blue, yellow), Animal themed things or anything you think looks kawaii. These are the kind of things you should get:


I really love this watch because it fits in with the fairy kei style, which is rare for an icewatch.


This is more retro but it's kind of kawaii because it's so small, I added a chain to it because it used to be a keyring from poundland.


Friendship bracelets, I made these myself.


Slushy necklace which I got from Dragon dreads they sell Kitsch, kawaii and retro jewelry and a whole load of other cool things.

Brightly coloured bangles.

This is more retro but it's kind of kawaii because it's so small, I added a chain to it because it used to be a keyring from poundland.

Plastic pearl bracelets.

Beaded bracelets in pink.

Owl watch necklace, I got this from primark.

Turtle ring and beaded bracelet.

Friendship bracelets, I made these myself.

A large fobwatch.
DIY
This is a quick tutorial that shows you how to make a gingerbread man feltie, I made mine into a necklace but you can make it into anything else (You could appliqué it to something).

What you will need:
- Brown felt (you can make your template first if you don't know how much to use).
- Embroidery floss - In pink, black and a brown that matches your felt.
- Buttons - just a few in a colour of your choice.
- Needle.
- Scissors.
- Pencil.
- A4 paper.
- Oh yeah I forgot stuffing, you need a little bit of that.

Start by folding your paper in half vertically.

On one side of the fold draw half of the gingerbread man silhouette, I drew around the buttons in the middle so that I knew how big to make it.

Refold the paper on the same fold (make sure the drawing is on the outside) and cut the shape out so that it makes the full template.

Draw on the features so that you can use the template to place marks on the felt (this helps to make sure that it's symmetrical, and you can check what size you want the eyes and the mouth to be).

Trace the outline of the template onto felt twice.

Cut them out and make a mark on one of them where you want to put the buttons.
The next part involves sewing, you have to sew on the buttons, Use backstitch for the mouth and do a French knot for the eyes (I wrapped the thread around the needle five times because I wanted to make big eyes). For the blush I made two small straight stitches parallel to each other.
Use two strands of pink floss, four strands of black floss for the eyes and two strands of black floss for the mouth.

Okay so I've had loads of these for years and didn't have a clue what they were for, I could never really be bothered to find out. But then the other day I was reading through my sewing book and saw one of these, then I read that they're used for threading needles which is really useful especially when trying to put multiple strands of floss through a tiny eye.

You put the wire part through the eye of the needle.

Put the end of the embroidery floss or thread through the wire.

Now just pull the wire back through the eye of the needle and the floss with it, Now you can thread a tiny needle with thick thread yay! :)

Just in case you don't know how to make a French knot here's a diagram.

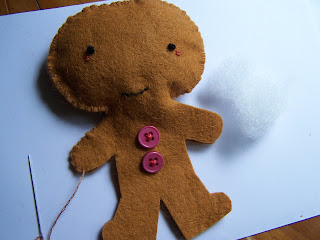
Going back to the tutorial, This is what it will look like once you've sewn on all the features.

Use two strands of brown embroidery floss to sew around the two felt pieces, as you sew fill the feltie with floss.

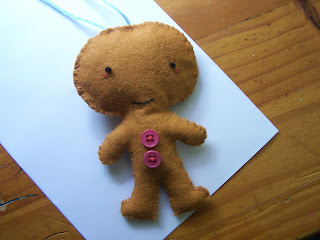
When you've sew it closed this is what it will look like.

Optional: On the back of the head I made two small holes and threaded some blue yarn through it, I used the needle threader for that.

This is how the finished thing looked.
Hope you enjoyed this post =) be sure to check out my others!


No comments:
Post a Comment